
Automating Azure Automation Accounts - Part 1 - Setting up the resources
I had the idea in my head and it was time to get it out into my Azure tenant. So the first thing I did was deploy a new Azure Automation account and connect it up to my Azure DevOps repository for source control.
Part 1 - Azure Automation
When I finally got around to migrating some of my scripts to the cloud, I quickly realized this wasn’t quite the same. I decided on Azure Automation since it seemed like the closest thing to scheduled tasks on-prem, and PowerShell was the first class citizen (at this point Azure Functions didn’t support PowerShell as a first class citizen, so it didn’t seem to fit my needs.
So I started building this example out to prove what was possible.
Create the Automation Account Manually
Start off by creating a new Automation Account. As part of this, I made sure to set up a RunAs Credential along with any other credentials or variables that I’ll need in my scripts
Next, I made sure I have an Azure DevOps account and created a new repo to house my runbooks. I would suggest using a subfolder within your repo to house your runbooks as it keeps things cleaner and allows you to keep other resources in the repo and not worry about them trying to deploy to the automation account. In this case, I took the initial tutorial runbooks from the new account and copied them into my repo as a sample.
Connect the Automation Account to Source Control
This is pretty easy. The Microsoft docs are clear on this so I won’t spend much time here. Suffice it to say, these are the steps:
- Create or verify a Run As account exists.
- This will create a new Application Registration in Azure AD for this account so it can authenticate to other services (like KeyVault if you wanted to store secrets there)

- Once created, you can go in to view the details along with the role(s) this account has on the subscription
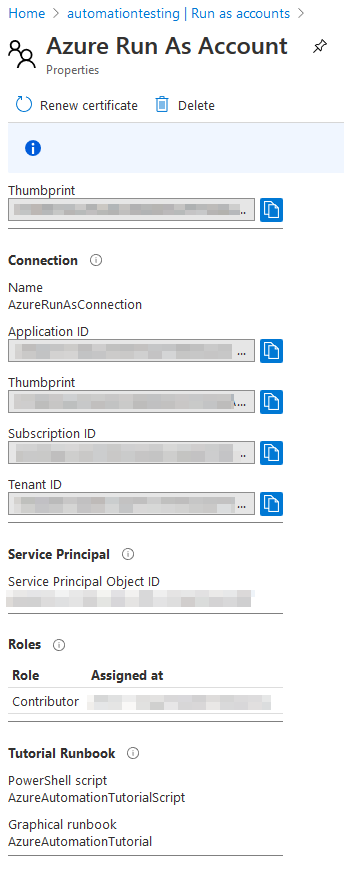
- Ignore the *Classic Run As. If you’re not sure when you’ll need it, you won’t.*
- This will create a new Application Registration in Azure AD for this account so it can authenticate to other services (like KeyVault if you wanted to store secrets there)
- Add a new source control connection. See the docs for more info, but I set the following:
- Source Control Type:
Azure Repos (Git)This depends on how you setup your repo - Repository:
AutomationRunbooksSelect the repo you created in Azure DevOps - Branch:
masterThis allows me to work on other branches and not worry about causing problems with production scripts until I’m ready - Folder Path:
/RunbooksI have this folder in my repo which contains all my desired runbooks. Nothing else in the repo will be synced to the Automation Account - Auto Sync:
OnAny commit to the master branch will trigger a new sync - Publish Runbook:
OnOnce synced, all the runbooks are automatically published instead of being in edit mode (meaning I need to go into each one and publish it manually - Once source control is set up you can force a sync, and then watch the job status on the
Sync jobstab. It’ll Queue it up, then change to Running, followed by a final status
- Source Control Type:
Note: One thing I found is that when I tried to include Python runbooks, an error occurred when the sync happened. Even though it states Python2 is acceptable, the import process seems out of date and appears to contain a validation that does not include Python2 as an option. The error message is:
    Failed to import runbook 'Test.py'.
    Exception: Cannot validate argument on parameter 'Type'. The argument "Python2" does not belong to the set "Graph,PowerShell,PowerShellWorkflow" specified by the ValidateSet attribute. Supply an argument that is in the set and then try the command again.
	Failed to sync.
	Failed to import runbook:
	- Test.py
I wound up removing the Python runbooks and the sync began working. So if you’re working with Python, you may have some extra debugging to do in order for this to work.
To wrap up Part 1, we’ll review what we’ve done:
- Create an Automation Account
- Create an Azure DevOps organization
- Create an Azure DevOps repository
- Create an Automation Account & set up source control
- Populate the DevOps repo with runbooks
- Check the Automation Account for successful sync
Now that all this is taken care of, I am ready for the next step. I need to share some code between multiple runbooks, so I’ll need to create a Module to upload and use in the Automation Account.
Comments