
Automating Azure Automation Accounts - Part 3 - Automate Module Deployment
With the Automation account and the Module created, it’s time to automate the deployment of the module!
Part 3 - Automating Custom Module Deployment to Automation Account
Introduction:
This article is part of a series on integrating Azure Automation Accounts with Azure DevOps. You can check out Part 1 or Part 2 first if you’d like.
Problem:
Following up from my previous post, I now have these things set up:
- An Azure DevOps Organization
- An Azure DevOps Repository (
AutomationRunbooks) - An Azure Automation Account
- Source control configured to pull from the repo
- Created a new PowerShell Module in VSCode
- Uploaded the module to an Automation Account
Now I need to automate the module so it’s automatically published to the Automation Account whenever a new commit is pushed to the master branch.
Task List
- Create a storage account
- Apply proper RBAC permissions
- Create a pipeline
- Test, Troubleshoot, Repeat
Solution
I started looking into Azure Pipelines and how to effectively push each new version of the module to the automation account. This proved to be more in depth than I thought, so this is my attempt to document the process. Note that I needed to use the Windows version of the build agent for this to work properly.
As soon as I create the pipeline and started playing with the activities available, I realized I was going to get to write a bit of PowerShell to make all this work. There may be ways to optimize some of this but this was my initial run at pipelines, so I used what I knew.
Step 1 - Test the module
The first step was to test the module manifest and import the module to verify it didn’t fail. When that passed, I would create the archive of the necessary files for the module and save it to the artifacts directory. While there is an ArchiveFiles action, it will archive all the files in the directory and I didn’t want to include everything. So I did it via PowerShell.
Step 2 - Set up the intermediate storage account
Remember when I mentioned before about your custom upload going to a storage account and then being imported into the Automation Account? That’s what we have to do here. So we need to create a storage account that will temporarily house our file. There’s a couple of things to note regarding this storage account:
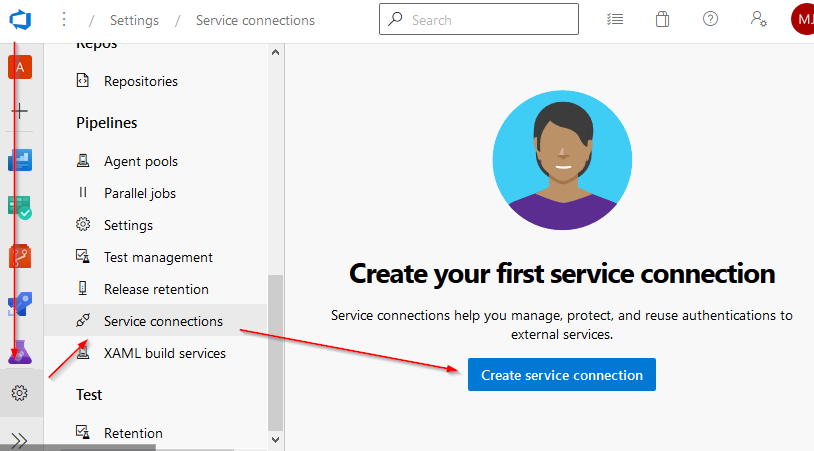
You need to assign the ADO (Azure DevOps) project permissions to the storage account. To do that, you’ll need to create a service connection. Open your project in ADO, click the Project Settings gear icon at the bottom and click Service Connections. Then Create service connection
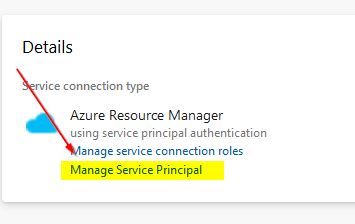
One that’s done, you can review and Manage Service Principal in AzureAD. You’ll find the name of your service connection here. Make a note and then navigate over to your Azure subscription where the storage account is.

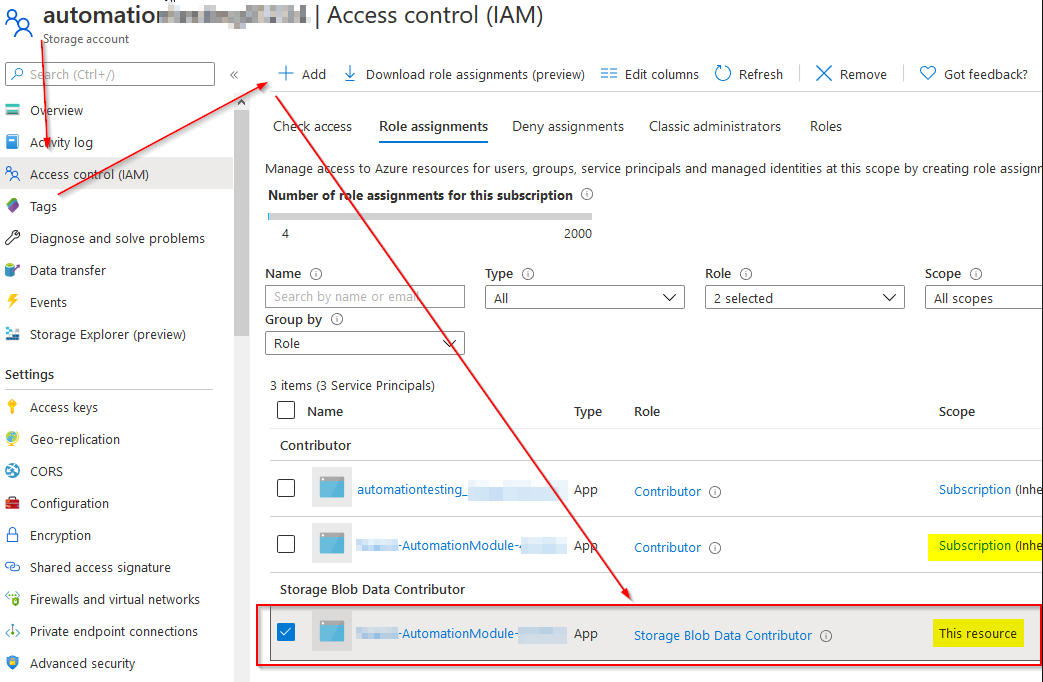
One thing to remember about creating this service connection is that the service principal now has the Contributor role to your entire subscription. This may not be what you want (it isn’t in my case), so we’re going to trim down the permissions to just what we need. To do that, we’ll start by opening up the storage account resource and clicking Access control (IAM). We need to add the service principal here as a Storage Blob Data Contributor. This role is required in order for our AzCopy action to work.
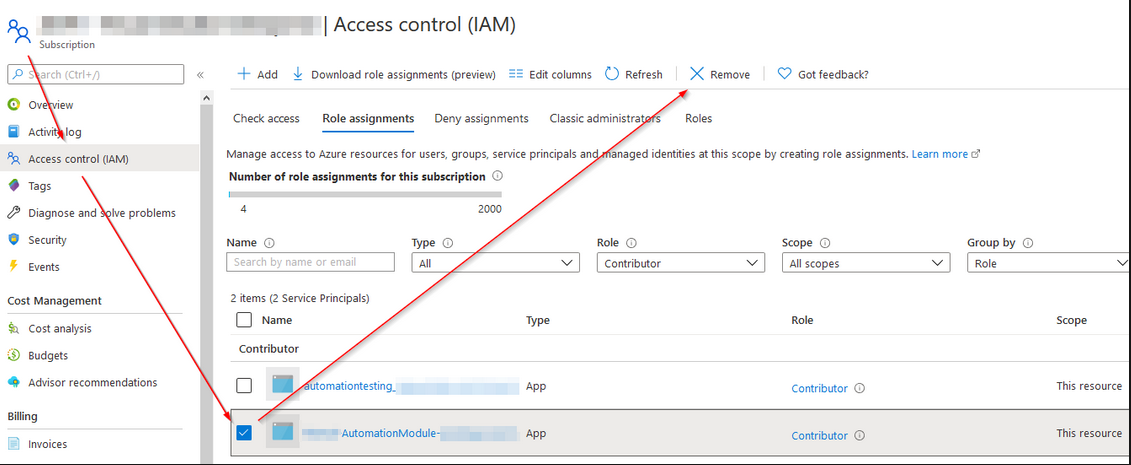
Next we want to remove the Contributor role from our subscription. You can click the Subscription link to navigate there, open the Access control (IAM) page and delete the service principal from the list.
Finally, because we removed the inherited permissions, we need to manually addthe Contributor role at the Automation Account level too. Navigate to that resoure and open the Access Control (IAM) tab, then add the service principal as a Contributor. Now we’re ready to work on the next steps.
Back in the Azure DevOps Pipeline, I now set up an AzCopy activity to copy the file to a storage account. The settings are straight forward enough, and I used the available pipeline variables to set the right source and destination.
Now, the only way to automate uploading a custom module is through PowerShell, so that’s where an AzurePowerShell action comes into play. By using this action vs a regular PowerShell action, I can leverage the Service Connection on my Azure tenant. In this action, I grab the primary storage account key, generate a SASToken for the blob, and upload the zip file to the automation account. After that, I spent up to 10 minutes waiting and checking for the module to successfully upload (and it will take a few minutes to upload and import).
That’s it. The module deployment pipeline is finally complete. Now we can deploy both a module and runbooks without having to do anything more than pushing code to the repo.
Conclusion
To wrap up Part 3, we’ll review what we’ve done:
- Create a new Storage Account
- Set up a Service Connection in our ADO project (repo)
- Modify the Service Connection RBAC permissions in the tenant
- Create the pipeline to Test, Compress, Copy, Upload and Verify the module.
Comments